Monday, 30 July 2012

Synchronous Event Receivers

Synchronous Event Receivers

SharePoint is a big (massive!) product, there are features and enhancements in SP2010 which I haven’t even used yet – mostly because I haven’t needed to.
One of these is the ability to run after events synchronously (ItemAdded, ListAdded and WebProvisioned). Previously all after events were executed asynchronously and on a background thread in a different process. What we can do now is run these after events on demand, they are executed according to the sequence number.
I used this feature the other day when creating an Event Receiver for a picture library and it’s pretty darn useful. Here’s the scenario I had -
When a picture is added to the library a field needs to automatically update with some EXIF metadata which is extracted from the picture.
The metadata must be visible to the user in the edit form for them to see before clicking OK.
In the above scenario I couldn’t use an asynchronous event receiver because the updated value in the field would not be visible to the user in the edit form. I needed to make sure that the event receiver would run as soon as the item was added and not in a background thread, this way the new value will be visible to the user in the edit form.
In order to make your event receiver Synchronous you can set the Synchronous property of the SPEventReceiverDefinition class (if you are binding programmatically). Or by creating a node in yourXML, see below for examples of each -
Programmatically
1
2
3
4
5
6
7
8
9
10
MyEventReceiver eventReceiver = new MyEventReceiver();
SPEventReceiverDefinitionCollection eventReceiverCol = myList.EventReceivers;
SPEventReceiverDefinition eventReceiverDef = eventReceiverCol.Add();
eventReceiver.Name = “My Event Receiver”;
eventReceiver.Synchronization = SPEventReceiverSyncronization.Synchronous;
eventReceiver.Type = SPEventReceiverType.ItemAdded;
eventReceiver.SequenceNumber = 100;
eventReceiver.Assembly = Assembly.GetExecutingAssembly().FullName;
eventReceiver.Class = eventReceiver.GetType().ToString();
eventReceiver.Update();
Using XML
1
2
3
4
5
6
7
8
9
10
<Receivers >
    <Receiver>
      <Name>MyEventReceiver</Name>
      <Type>ItemAdded</Type>
      <Assembly>$SharePoint.Project.AssemblyFullName$</Assembly>
      <Class>MySolution.EventReceivers.MyEventReceiver</Class>
      <SequenceNumber>100</SequenceNumber>
      <Synchronization>Synchronous</Synchronization>
    </Receiver>
  </Receivers>

Tuesday, 24 July 2012

Creating Webpart using Sharepoint Designer 2010

Another tidbit I wanted to share regarding SharePoint Designer 2010 that may be of interest to a lot of developers, site administrators, designers, and power users alike. If you have the permissions, you now have options directly in the interface of SharePoint Designer, to save your web parts out to a local file, or, push it into the Site Gallery!
In SharePoint Designer, let’s add a Data View Web Part to our page, by going to the Insert ribbon tab, selecting Data View, and choosing the list which we want to create an XSLT Data View for…
image
Then configure your web part as you’d like to… and from there in SharePoint Designer 2007, we were stuck with going back to the page which we placed this, using the chevron on the web part in Edit mode on the page, and then choosing Export from the menu. This is no longer with SharePoint Designer 2010!
If you look at the ribbon while you are working on the Data View Web Part, click into the Web Part ribbon tab under List View Tools
image
Once you have done that, if you look all the way over to the right of that ribbon tab, you will see a section called Save Web Part.
image
Which presents two options, To Site Gallery, and To File. This is just another one of the many timesavers built into the overhauled SharePoint Designer 2010. If we select To Site Gallery, we are presented with a pop-up that will allow you to set the title and description for your web part
image
As well as a Set Properties… button, which will allow you to set web part properties on the saved version of the web part before putting it into the gallery.
image
Once you click OK, you are presented with another pop-up
image
This asks you if you want to always just show data from the current site list, tied to the List ID GUID, or, if you want to make it relative, which will tie it down to the list name itself, relative to the site in which it is displayed.
Now, if we meander on over to the web part gallery for this site collection, Site Actions > Site Settings
image
and selecting Web Parts under Galleries
image
We will now see that our web part which we created in SPD 2010, is now deployed out to the Site Collection Web Part Gallery!
image
If we choose the alternate option, To File from the Save Web Part section of the ribbon, you will be prompted to save it locally as expected.
image
There is a lot of new functionality in SharePoint Designer 2010. As I get around to it, I’ll keep more of these posts coming.

Monday, 23 July 2012

Creating Jquery Custome Webpart

In my last post,I have shown how to use jQueryUI to interact with ASP.NET page with an accordion control. Then I thought, can I do the same stuff with SharePoint 2010 as SharePoint use ASP.NET as base framework. And I have implemented the same stuff in SP2010 as well. These are steps I followed: 

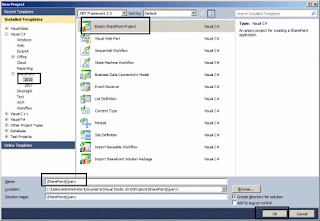
Step1: Create a New project in VS2010 RC New Project >> SharePoint 2010 as template >> Choose "Empty SharePoint Project" >> Project Name: SharePointjQuery >> Click OK.


Step2. Right click on the "SharePointjQuery" project,  Add >> New Item >> Choose "Visual Web Part" >> Name: WebPartjQuery >> Click on "Add" button. 


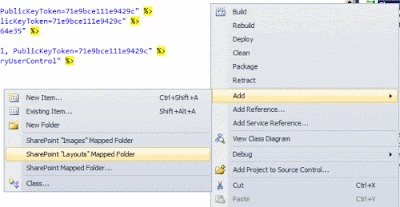
Step3: Right click on the "SharePointjQuery" project, Add >> choose "SharePoint Layouts Mapped folder". Automatically a new folder is created named: "SharePointjQuery". 


Step4: Under this new folder, create 2 new folders named: "css" and "js" respectively. This will contain jQuery scripts and cascading style sheet.  


Step5: Drag all javascripts, css and div tags as discussed in last post. Deploy the solution.

Step6: Go to SharePoint site >> Edit >> Insert >> Web Part >> Custom >> WebPartjQuery >> Add

Friday, 20 July 2012

JQuery Basics in SharePoint 2010

jQuery and SharePoint 2010: the Basics

SharePoint out-of-the-box is functional, but fairly lacking when it comes to really wanting to extract and beautify your data. This is where jQuery comes in. It’s light, easy to implement, and actually hooks up with a bunch of SharePoint services when you have the right plugins. Consider this a basic intro to what you can do in jQuery. It’s really the tip of the iceberg, so keep exploring!

Setup jQuery for SharePoint

First things first, let’s make sure we’re properly setup. If you are using SharePoint behind a secure server (as part of an intranet possibly), then you’ll probably want to load up a local copy of the jQuery script instead of grabbing it from jquery.com each time the page loads. So grab the latest build from jquery.com and dump it in “Style Library/scripts/jquery.js”.
Next, go to your master page and put the following script (depending on where your file is) anywhere within the HEAD section:
 <script type="text/javascript" src="/Style Library/scripts/jquery.js"></script>
And that’s it! Now every time a page loads, you’re pulling in all of jQuery’s power. Minified, the file is only about 31kb, so (considering everything else SharePoint is loading) this isn’t that much of a burden. But you can also just load the jQuery script in page layouts, or even within individual pages.
Now that you’ve got jQuery loaded, it might be in your best interest to create another .js file that holds all of your custom scripts. You can choose to do scripts on a per page or page layout basis as well, but this keeps things more organized. So create a “myscripts.js” file in “Style Library/scripts” (the same folder we put jQuery.js in). And don’t forget to reference it in your master page, right under the jquery code. So now the above code is amended to read:
 <script type="text/javascript" src="/Style Library/scripts/jquery.js"></script>
 <script type="text/javascript" src="/Style Library/scripts/myscripts.js"></script>
Now that we’ve got everything loaded, what can we do?

What can you do with jQuery in SharePoint?

Here are just a few things:

Markup your body content and make it interactive

I use this for something like an FAQ section. We’ll put every question in an H4 tag with a class of “question” and every answer in a span with a class of “answer” directly after the h4. That’s all we have to do to our HTML source in the page. Then in our custom scripts file (above) we add the following jQuery code:
$(document).ready(function(){
 $("span.answer").slideUp(); // hides all of the answers
 $("h4.question").click(function(){ // when you click an h4
   $(this).next("span.answer").slideToggle('fast') //the answer slides down
 })
});
Keep in mind you may want to add some CSS that make the h4 seem more like a link (cursor:pointer, etc.) so people know they should click.

Make an “instant” search/filter box


Check out this post about how to create this. You can create a filter, and then append it to any list across your site.

Create a slideshow of content from a picture library


I’ve written a separate post with precise instructions about how to do this, but here’s the general idea:
  1. Create a picture library
  2. Make a new page
  3. Put a CQWP in the page, and wrap it in some divs with specific classes
  4. Use the tinycarousel plugin to convert that Content Query WebPart into a slideshow/carousel
  5. Style with CSS

Create tabs (not the jQuery UI kind)

Check out this post on creating tabs using jQuery, but without using the jQuery UI. It’s a bit easier with the UI plugin, but again, the idea is:
  1. Create the tabs in HTML
  2. Create each panel in HTML
  3. Add the jQuery
  4. Style it with CSS

Use SPServices to really hook into SharePoint with jQuery

I’ve started writing what is turning into a small series on using jQuery with SPServices. Some of the things you can do:
Rollup items from multiple lists
Rollup from multiple lists and put the results in a new list
Rollup articles across a site collection

Task form creation

Sandbox solution.

Sharepoint online 2010 : Delpy sandbox solution

Check below link of deploying sand box solution.


http://msdn.microsoft.com/en-us/office365trainingcourse_lab_2_1_topic4.aspx

Sandbox solution : Error: “The sandboxed code execution request was refused because the Sandboxed Code Host Service was too busy to handle the request”

Using JQuery in Sharepoint

Tuesday, 17 July 2012

SPS 2010 Questions

http://sharepointgauravgoyal.blogspot.in/p/sharepoint-questions-and-answers.html


Will help  you to understand SPS concepts.

Once you are on projects then you will be dead in meeting the deadline. And after completion of project people will expect that you are technically through in SPS.

So this is the right time to devote some time on understanding concepts also, along with assignment.